Difference between revisions of "UM:Effects Colourcorrection"
m (Text replacement - "|Platform:" to "|UM:") |
m (Text replacement - "Platform:" to "UM:") |
||
| Line 14: | Line 14: | ||
<p class="p_DVBodyText">[[File:ch-effects_effects_layers.png|alt=ch-effects_Effects_Layers]]</p> | <p class="p_DVBodyText">[[File:ch-effects_effects_layers.png|alt=ch-effects_Effects_Layers]]</p> | ||
<p class="p_DVBodyText"><span class="f_DVBodyText"> </span></p> | <p class="p_DVBodyText"><span class="f_DVBodyText"> </span></p> | ||
| − | <p class="p_DVBodyText"><span class="f_DVBodyText">You can control the effects that are available in the base and master layers and the order that they appear in the effects tree (which is the order they are processed in) by editing the following lines in the main preference file </span><span class="f_DVBodyText" style="font-style: italic;">general.prefs</span><span class="f_DVBodyText"> (See Appendix [[ | + | <p class="p_DVBodyText"><span class="f_DVBodyText">You can control the effects that are available in the base and master layers and the order that they appear in the effects tree (which is the order they are processed in) by editing the following lines in the main preference file </span><span class="f_DVBodyText" style="font-style: italic;">general.prefs</span><span class="f_DVBodyText"> (See Appendix [[UM:Appendix_Application_Preferences|Application Preferences]]) :</span></p> |
<p class="p_DVBodyText"><span class="f_DVBodyText"> </span></p> | <p class="p_DVBodyText"><span class="f_DVBodyText"> </span></p> | ||
<div style="text-align: left; text-indent: 0px; padding: 0px 0px 0px 0px; margin: 0px 0px 0px 40px;"><table border="0" cellpadding="0" cellspacing="0" style="line-height: normal;"><tr style="vertical-align:baseline" valign="baseline"><td width="13"><span style="font-size: 11pt; font-family: 'Arial Unicode MS', 'Lucida Sans Unicode', 'Arial'; color: #000000;">•</span></td><td><span class="f_DVConfigParam">defaultRealTimeEffectIDs</span><span class="f_DVBodyTextIndent1"> - effects available in </span><span class="f_DVBodyTextIndent1" style="font-style: italic;">Master</span><span class="f_DVBodyTextIndent1"> layer</span></td></tr></table></div><div style="text-align: left; text-indent: 0px; padding: 0px 0px 0px 0px; margin: 0px 0px 0px 40px;"><table border="0" cellpadding="0" cellspacing="0" style="line-height: normal;"><tr style="vertical-align:baseline" valign="baseline"><td width="13"><span style="font-size: 11pt; font-family: 'Arial Unicode MS', 'Lucida Sans Unicode', 'Arial'; color: #000000;">•</span></td><td><span class="f_DVConfigParam">defaultSecondaryCCEffectIDs</span><span class="f_DVBodyText"> - effects available in </span><span class="f_DVBodyText" style="font-style: italic;">Base</span><span class="f_DVBodyText"> and </span><span class="f_DVBodyText" style="font-style: italic;">CC Layers</span></td></tr></table></div><p class="p_DVBodyText"><span class="f_DVBodyText"> </span></p> | <div style="text-align: left; text-indent: 0px; padding: 0px 0px 0px 0px; margin: 0px 0px 0px 40px;"><table border="0" cellpadding="0" cellspacing="0" style="line-height: normal;"><tr style="vertical-align:baseline" valign="baseline"><td width="13"><span style="font-size: 11pt; font-family: 'Arial Unicode MS', 'Lucida Sans Unicode', 'Arial'; color: #000000;">•</span></td><td><span class="f_DVConfigParam">defaultRealTimeEffectIDs</span><span class="f_DVBodyTextIndent1"> - effects available in </span><span class="f_DVBodyTextIndent1" style="font-style: italic;">Master</span><span class="f_DVBodyTextIndent1"> layer</span></td></tr></table></div><div style="text-align: left; text-indent: 0px; padding: 0px 0px 0px 0px; margin: 0px 0px 0px 40px;"><table border="0" cellpadding="0" cellspacing="0" style="line-height: normal;"><tr style="vertical-align:baseline" valign="baseline"><td width="13"><span style="font-size: 11pt; font-family: 'Arial Unicode MS', 'Lucida Sans Unicode', 'Arial'; color: #000000;">•</span></td><td><span class="f_DVConfigParam">defaultSecondaryCCEffectIDs</span><span class="f_DVBodyText"> - effects available in </span><span class="f_DVBodyText" style="font-style: italic;">Base</span><span class="f_DVBodyText"> and </span><span class="f_DVBodyText" style="font-style: italic;">CC Layers</span></td></tr></table></div><p class="p_DVBodyText"><span class="f_DVBodyText"> </span></p> | ||
| Line 23: | Line 23: | ||
<td style="width:36px; border: none" valign="top" width="36"><p class="p_DVTableText">[[File:dv_note.png|alt=dv_note]]</p> | <td style="width:36px; border: none" valign="top" width="36"><p class="p_DVTableText">[[File:dv_note.png|alt=dv_note]]</p> | ||
</td> | </td> | ||
| − | <td style="width:760px; border: none" valign="middle" width="760"><p class="p_DVTableText"><span class="f_DVTableText">See appendix [[ | + | <td style="width:760px; border: none" valign="middle" width="760"><p class="p_DVTableText"><span class="f_DVTableText">See appendix [[UM:Appendix_Effect_Identifiers|Effect Identifiers]] for a list of available effect you can use in these preference settings.</span></p> |
</td> | </td> | ||
</tr> | </tr> | ||
| Line 29: | Line 29: | ||
</div> | </div> | ||
<p class="p_DVHeader1"><div id="effectslayer"></div><span class="f_DVHeader1">Effects Layer</span></p> | <p class="p_DVHeader1"><div id="effectslayer"></div><span class="f_DVHeader1">Effects Layer</span></p> | ||
| − | <p class="p_DVBodyText"><span class="f_DVBodyText">The </span><span class="f_Keywords">Effects</span><span class="f_DVBodyText"> layer, at the top of the effects tree, contains no effects by default. When you [[ | + | <p class="p_DVBodyText"><span class="f_DVBodyText">The </span><span class="f_Keywords">Effects</span><span class="f_DVBodyText"> layer, at the top of the effects tree, contains no effects by default. When you [[UM:Effects_General|add user effects]] to a segment they will be listed here.</span></p> |
<p class="p_DVHeader1"><div id="additionallayers"></div><span class="f_DVHeader1">Additional Secondary Colour Correction Layers</span></p> | <p class="p_DVHeader1"><div id="additionallayers"></div><span class="f_DVHeader1">Additional Secondary Colour Correction Layers</span></p> | ||
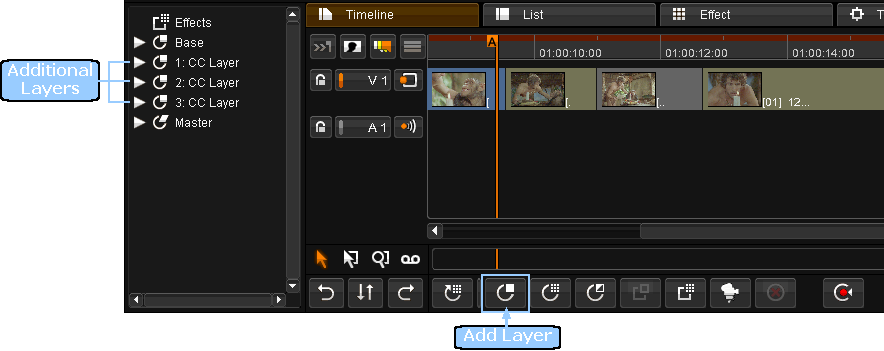
<p class="p_DVBodyText"><span class="f_DVBodyText">Additional colour correction layers can be added to the active segment by pressing the </span><span class="f_DVGUIElement">Add Layer</span><span class="f_DVBodyText"> button on the </span><span class="f_Keywords">effects toolbar</span><span class="f_DVBodyText">. This will add the layers to the effects tree. The layers are numbered from 1 according to their position within the effects tree:</span></p> | <p class="p_DVBodyText"><span class="f_DVBodyText">Additional colour correction layers can be added to the active segment by pressing the </span><span class="f_DVGUIElement">Add Layer</span><span class="f_DVBodyText"> button on the </span><span class="f_Keywords">effects toolbar</span><span class="f_DVBodyText">. This will add the layers to the effects tree. The layers are numbered from 1 according to their position within the effects tree:</span></p> | ||
Latest revision as of 12:11, 15 October 2014
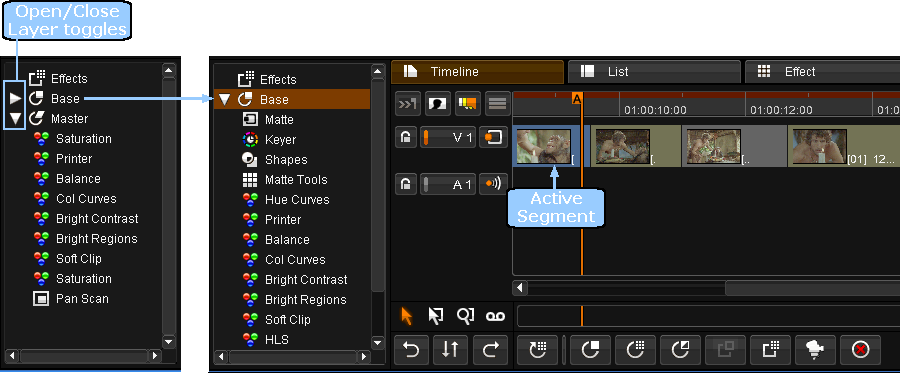
Every segment has two colour correction layers available by default, the Base and Master layers.
| • | The Base layer is a fixed colour adjustment layer at the beginning of processing |
| • | The Master layer is a fixed colour adjustment layer at the end of processing. |
The Base layer also contains isolation effects, whilst the master layer does not.
These layers are displayed in the effects tree, and as the active playhead changes segment the effects tree updates to list the effects available for the active segment on the timeline. To expand an effects layer, click on the arrow toggle button next to the layer name:
You can control the effects that are available in the base and master layers and the order that they appear in the effects tree (which is the order they are processed in) by editing the following lines in the main preference file general.prefs (See Appendix Application Preferences) :
| • | defaultRealTimeEffectIDs - effects available in Master layer |
| • | defaultSecondaryCCEffectIDs - effects available in Base and CC Layers |
Not all effects are necessarily available by default, and you can add/remove effects from either layer by adding/removing the appropriate IDs from the preferences file.
See appendix Effect Identifiers for a list of available effect you can use in these preference settings. |
The Effects layer, at the top of the effects tree, contains no effects by default. When you add user effects to a segment they will be listed here.
Additional Secondary Colour Correction LayersAdditional colour correction layers can be added to the active segment by pressing the Add Layer button on the effects toolbar. This will add the layers to the effects tree. The layers are numbered from 1 according to their position within the effects tree:
These additional layers will have the same set of effects available as the base layer.
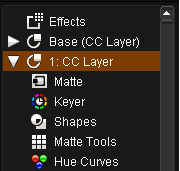
You can add an unlimited number of secondary colour correction layers and each contains shapes, keys and mattes :
Layers are always added to the active segment only, they are not added to selected segments or any other segments. |
Layer Router
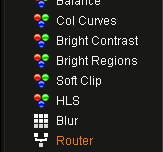
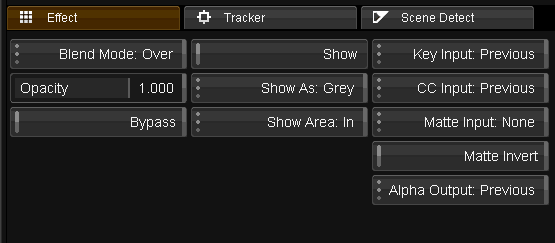
It is possible to use the layer router (at bottom of every layer) to set various layer specific parameters, including how layers are composited (blended) on top of each other.
The Router has an effect tab containing the parameters available.
It is possible to change the layer opacity, or bypass the layer completely.
Blend Mode
The layer router includes a Blend Mode that controls how the layer is composited over layers below. It has the following settings :
| • | Over |
| • | Add |
| • | Subtract |
| • | Dodge |
| • | Burn |
| • | Lighten |
| • | Darken |
| • | Hardlight |
| • | Softlight |
| • | Screen |
| • | Overlay |
