Difference between revisions of "UM:Red Tips"
m (Text replacement - "Platform:" to "UM:") |
|||
| Line 1: | Line 1: | ||
<div class="manualcontent"> | <div class="manualcontent"> | ||
| − | {{Template:M-Navlinks-top|UM:Manual|UM:Red_Workflows|UM: | + | {{Template:M-Navlinks-top|UM:Manual|UM:Red_Workflows|UM:ACES}} |
{{Template:M-Title|Working with R3D Files}} | {{Template:M-Title|Working with R3D Files}} | ||
| Line 130: | Line 130: | ||
<p class="p_DVBodyText"><span class="f_DVBodyText"> </span></p> | <p class="p_DVBodyText"><span class="f_DVBodyText"> </span></p> | ||
| − | {{Template:M-Navlinks-bottom|UM:Manual|UM:Red_Workflows|UM: | + | {{Template:M-Navlinks-bottom|UM:Manual|UM:Red_Workflows|UM:ACES}} |
</div> | </div> | ||
Latest revision as of 16:50, 27 June 2016
These are some hints at best practice when working with R3D files. Note that there is great flexibility in R3D metadata and the following notes are a general guide only.
Colour Space
Set this to REDSpace (this is the default).
Gamma Curve
Set this to REDlog - the default if using a Log project.
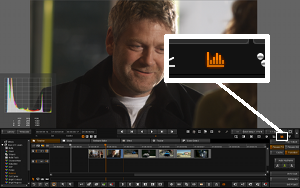
With the Colour Space and Gamma Curve settings as above, you may want to check the application histogram output and ensure that your white levels are good and no clipping is taking place.
Check the display histogram via the F11 hotkey or by pressing the histogram GUI button as shown below :
Histogram display and histogram button |
OLPF
Turn OLPF filtering off and replace with DVO Sharpen. See below.
Kelvin
If the Kelvin value is low (e.g. 3200) you may want (or need) to use DVO Grain to improve image quality.
Half Premium 2K vs ZOM 2K Resize
The following images display the quality difference between the Half Premium decode of a 4K Full Premium shot, and the ZOM filter resize of the Full Premium 4K to 2K.
Higher quality can be observed using the ZOM filter.
OLPF versus DVO Sharpen Filtering
These examples use the ZOM filtered 2K shot and shows a higher quality result with the DVO Sharpen tool.
Tips
Resolution Support
Full Premium (or greater) source support requires 64 bit Windows.
Memory Usage
The RED SDK can use a lot of memory. Signs of memory may include :
| • | Memory allocation failures/warning (logs or CMD shell) |
| • | Occasional Missing Media plates being displayed in the monitor. |
32 Bit Windows
Set the application Image Memory to a smaller value.
Via the main application Preferences/Rendering section :
or via the main preference file general.prefs :
memoryImagePoolMaxMB 700
Turn Render BG off :
64 Bit Windows
On 64 bit Windows, you should have a much greater memory headroom. This should allow you to set Image Memory to 3000 (assuming 4GB total RAM available) :
Bit Depth
For efficiency reasons (memory and processing), R3D files will be defaulted to using a bit depth of 10 bits. This default can be changed (see the Properties and Metadata section).
Create Clone
The Create Clone property will default to enabled (see the Properties and Metadata section).
OLPF Compensation
This compensates for the camera low-pass filter and will sharpen the image. The default setting is taken from the Clip.prefs file (see Properties and Metadata).
