Difference between revisions of "UM:Red Properties And Metadata"
m (Text replacement - "|Platform:" to "|UM:") |
m (Text replacement - "Platform:" to "UM:") |
||
| Line 68: | Line 68: | ||
<td style="width:36px; border: none" valign="top" width="36"><p class="p_DVTableText">[[File:dv_doc.png|alt=dv_doc]]</p> | <td style="width:36px; border: none" valign="top" width="36"><p class="p_DVTableText">[[File:dv_doc.png|alt=dv_doc]]</p> | ||
</td> | </td> | ||
| − | <td style="width:760px; border: none" valign="middle" width="760"><p class="p_DVTableText"><span class="f_DVTableText">For more detail on tables and their use, see the [[ | + | <td style="width:760px; border: none" valign="middle" width="760"><p class="p_DVTableText"><span class="f_DVTableText">For more detail on tables and their use, see the [[UM:Tables|Tables]] section.</span></p> |
</td> | </td> | ||
</tr> | </tr> | ||
| Line 584: | Line 584: | ||
<p class="p_DVBodyText">[[File:ch-red_r3d-property-dialog-timecodes.png|alt=ch-red_r3d-property-dialog-timecodes]]</p> | <p class="p_DVBodyText">[[File:ch-red_r3d-property-dialog-timecodes.png|alt=ch-red_r3d-property-dialog-timecodes]]</p> | ||
<p class="p_DVBodyText"><span class="f_DVBodyText"> </span></p> | <p class="p_DVBodyText"><span class="f_DVBodyText"> </span></p> | ||
| − | <p class="p_DVBodyText"><span class="f_DVBodyText">There are </span><span class="f_DVBodyText" style="font-weight: bold;">two</span><span class="f_DVBodyText"> timecodes embedded in the R3D file metadata. We consider one as the </span><span class="f_DVBodyText" style="font-style: italic;">primary (1st) </span><span class="f_DVBodyText">and one as the </span><span class="f_DVBodyText" style="font-style: italic;">secondary (2nd)</span><span class="f_DVBodyText">. The timecodes displayed in the properties window depend on which timecode we extract on file import. </span><span class="f_Warning">See [[ | + | <p class="p_DVBodyText"><span class="f_DVBodyText">There are </span><span class="f_DVBodyText" style="font-weight: bold;">two</span><span class="f_DVBodyText"> timecodes embedded in the R3D file metadata. We consider one as the </span><span class="f_DVBodyText" style="font-style: italic;">primary (1st) </span><span class="f_DVBodyText">and one as the </span><span class="f_DVBodyText" style="font-style: italic;">secondary (2nd)</span><span class="f_DVBodyText">. The timecodes displayed in the properties window depend on which timecode we extract on file import. </span><span class="f_Warning">See [[UM:Red_Conforming|Conforming with Red]].</span></p> |
<p class="p_DVHeader3"><span class="f_DVHeader3">First Timecode</span></p> | <p class="p_DVHeader3"><span class="f_DVHeader3">First Timecode</span></p> | ||
<p class="p_DVBodyText"><span class="f_DVBodyText">In the metadata, this is known as the </span><span class="f_DVBodyText" style="font-style: italic;">absolute</span><span class="f_DVBodyText"> timecode.</span></p> | <p class="p_DVBodyText"><span class="f_DVBodyText">In the metadata, this is known as the </span><span class="f_DVBodyText" style="font-style: italic;">absolute</span><span class="f_DVBodyText"> timecode.</span></p> | ||
Latest revision as of 12:11, 15 October 2014
The RED R3D format contains a wide variety of metadata. Some of the metadata is fixed and will be displayed only. Other metadata elements are variable and can be edited.
We can edit the non-fixed R3D metadata elements in the library via the Library/Properties dialog. We can also choose to set the default values for some on file import and capture/conform.
The RED R3D file header also contains a frame rate. This is shown in the library and set on the imported R3D shot. This frame rate may be different to the main project rate, or current composition rate. This may cause problems for you if you create an EDL from the composition and need to use it to re-conform to the R3D shots later. |
Default Settings
The user can specify certain defaults to use for the following metadata elements :
| • | Decode Quality |
| • | Gamma Curve (via project colour scaling setting) |
| • | Bit depth |
| • | Create Clone setting |
| • | OLPF Compensation |
| • | Detail |
Viewing and Setting Properties
View the properties of an R3D shot in the application library or via the ..Properties dialog window. The Properties dialog also lets you set shot properties.
Note that the default values for some R3D shot properties are set using the configuration file Clip.prefs (see below). |
Library View
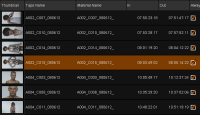
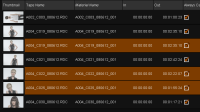
If the library columns are not present, you will need to insert them manually.
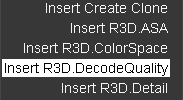
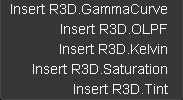
Insert the R3D specific library columns by right-clicking on the library header row and choosing to insert the desired column :
Insert R3D columns :
You can also use Insert Metadata to add a column that displays all the R3D metadata in a single instance (this is the same data as shown in the Properties dialog described below. |
For more detail on tables and their use, see the Tables section. |
Shot Properties
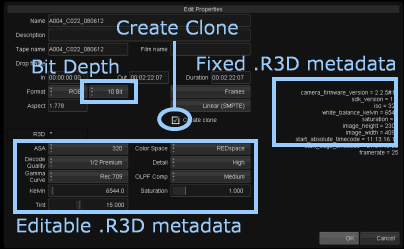
You can also view the properties of a single shot, and set these properties (for single or multiple shots), using the Properties button in the application library. With an R3D shot selected, press the ..Properties button :
R3D Properties Window
Only the properties you modify will be set (saved). This is also true when you select multiple shots. |
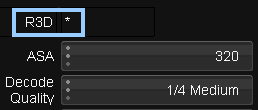
If a property is changed, the property dialog will display an asterisk (*) beside the R3D label :
An asterisk means an R3D property has been changed
Single Shot |
Multiple Shots |
Select one R3D shot and press the ..Properties button to view and modify the properties for the selected shot. |
Select multiple R3D shots and press the ..Properties button to modify the properties for all selected shots. |
Clip.prefs File and Default Settings
Location : |
C:\Nucoda\2014_1\root\Clip.prefs |
The Clip.prefs file is created in the application ROOT folder and is used to store the default preference settings for bit depth, cloning, quality, OLPF compensation and detail.
The Clip.prefs file has a simple ASCII format :
clipPrefs { R3D { extension "r3d" bitDepth "10bit" createClone true decodeQuality "1/2 Premium" olpfComp "Medium" ... } } |
R3D Properties
Bit Depth
Default : |
10 bit |
Set Via : |
Clip.prefs file |
Parameter : |
bitDepth |
Values : |
8bit, 10bit, 16bit |
RED R3D shots will be set to the given bit depth on load.
Create Clone
Default : |
true |
Set Via : |
Clip.prefs file |
Parameter : |
createClone |
This controls the proxying behaviour of R3D files.
With Create Clone true (default), every R3D shot will be transparently cloned (proxied) to DPX. This clone will be treated as the source.
This has performance advantages and eliminates the requirement to continually decode the source R3D files. |
Note that if other R3D shot properties are changed, the shot clone (and any other caches) will need to be re-generated. |
ASA
Default : |
From R3D file |
This is the speed of the "film" and its sensitivity to light. The value will match the ASA setting as applied by the camera operator.
Decode Quality
Default : |
1/2 Premium |
Set Via : |
Clip.prefs file |
Values : |
Full Premium , 1/2 Premium , 1/2 Medium , 1/4 Medium , 1/8 Medium, 1/16 Medium |
This is the decoded size and quality generated from the raw R3D shot data and used as a source.
Note that if you change the decode quality for an R3D shot, the reported width and height of the clip will update dynamically in the library. Any caches present will be invalidated and need to be regenerated. |
OLPF Compensation
Default : |
Medium |
Values : |
Off , Low , Medium , High |
Set Via : |
Clip.prefs file |
Parameter : |
olpfComp |
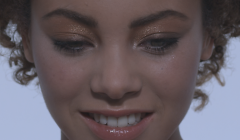
OLPF Compensation compensates for the camera low-pass filter and has the effect of sharpening the image.
OLPF Compensation Examples
Note that the results of OLPF compensation require viewing on a proper output display device. The following images show a very rough view of the sharpening effect.
Detail
Default : |
High |
Values : |
Low , Medium , High |
Set Via : |
Clip.prefs file |
Parameter : |
detail |
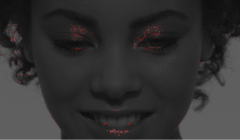
This is detail extraction.
Detail Example
Kelvin
Default : |
From R3D file |
A measure of colour temperature, used here to represent white balance. The value will match the Kelvin setting as applied by the camera operator.
Color Space
Default : |
REDspace |
Values : |
REDspace , Rec.709 , CameraRGB |
Gamma Curve
Default : |
From Project Colour Scaling |
Values : |
Linear , Rec.709 , REDspace , REDlog, PDlog685, PDlog985 |
PDlog685 (PDlog985) is a standard linear to Cineon log conversion with a white point at 685 (985). Although "standard" (Cineon style) conversions, you should test and exercise caution because the PDlog settings may have variable (lesser) dynamic range compared to normal REDlog. |
Default
The default R3D Gamma Curve element will be assigned to match the project colour scaling.
The values map as follows :
Project Colour Scaling |
R3D Gamma Curve |
Linear (SMPTE) |
Rec.709 |
Linear (CGR) |
REDspace |
Film Log |
REDlog |
Video Log |
REDlog |
Tint
Default : |
From R3D file |
Saturation
Default : |
From R3D file |
Exposure
Default : |
From R3D file |
Header Metadata
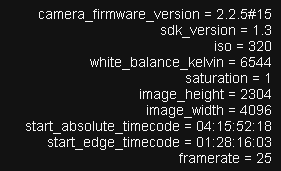
R3D header metadata is displayed on the right hand side of the Properties window. Many of the elements will record the original camera setup.
R3D Header Metadata
Note that the header metadata includes a framerate element. This is the original frame rate used to record the shot and might be different to the current project or composition rate. |
Timecodes
There are two timecodes embedded in the R3D file metadata. We consider one as the primary (1st) and one as the secondary (2nd). The timecodes displayed in the properties window depend on which timecode we extract on file import. See Conforming with Red.
First Timecode
In the metadata, this is known as the absolute timecode.
Second Timecode
In the metadata, this is known as the edge timecode.

