Support:ValhallPanelSetup
Contents
Valhall Control Panels consist of four user panels and a Power and Communications Unit (PCU) :
- Media, Image, Colour and Scribe (tablet) panels
- PCU power/communications
Later Mark 2 Valhall panels use a PCU. Older Mark 1 Valhall panels have the PCU integrated inside the Image panel.
Cabling
The panels connect to the PCU using special cables and the PCU connects to the host computer via a cross-over ethernet cable.

Network
Host IP Address
By default, the host computer network port is set to :
| IP Address | 192.168.64.1 |
| Subnet Mask | 255.255.255.0 |
If you change this you will also need to set the appropriate panel IP addresses as well. See Changing Valhall IP Address below.
Valhall Panel IP Addresses
By default, the Valhall panel network port is set to :
| IP Address | 192.168.64.2 |
| Subnet Mask | 255.255.255.0 |
Environment
An environment variable is created during application installation (if Valhall Control Panel is selected). It is set to the default IP address of the panel :
For Nucoda :
| NUCODA_VALHALLPANEL | 192.168.64.2 |
For Phoenix :
| PHOENIX_VALHALLPANEL | 192.168.64.2 |
Changing Valhall IP Address
By default, the Valhall panel has an IP address of 192.168.64.2.
To change this press and hold the Event and Enter keys on the Image Panel when powering it up. After the panel initialisation, instructions for changing the panel IP address will appear in the LED display :

Instructions will appear in the large LED panel at the top of the Image panel.
Use the four knobs below the LED display to change the IP address. Once complete, save the new address by pressing the BookM and Enter keys.
The LED instructions tell you to use the Shift key. However, keys have been moved and the Shift key referred to is now BookM.
You will also need to :
- Modify the Valhall environment (see above).
- Modify the host port IP address.
- Modify the Windows registry for the Valhall mouse driver (if used). See below.
Valhall Mouse Driver
The Image Panel includes a trackball and buttons.
This works as a mouse with the Digital Vision Mouse Driver installed. The driver is installed automatically if you select to install the Valhall Panel when installing the main software application.
The mouse driver is installed as a Windows service and can be managed in the normal way via :
Control Panel / Administrative Tools / Services
The service is called DvMouseDriver.
When running, an icon will be present in your Windows system tray :


Valhall Panel IP Change
If you change the Valhall panel IP address, you will need to modify the Windows Registry to ensure the panel mouse continues working :
- Start / Run : regedit
- Navigate to :
HKEY_LOCAL_MACHINE / Software / Digital Vision / Valhall / RTC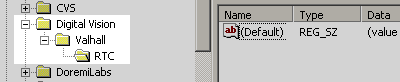
- Right-click in the right-hand pane and select :
New / String Value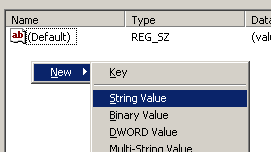
- Name this string value : PanelIP
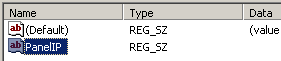
- Then double-click it and enter the new panel IP address as its value :

- Reboot the system to ensure the DvMouseDriver service picks up the registry value for the new IP address.


