Support:PrecisionPanelSetup
Precision is composed of three panels :
- Precision Colour
- Precision Transport
- Precision Touch
This document is applicable to all Digital Vision products that support the Precision Panel. Some file paths use the product name and version in the path. We will indicate this using the words PRODUCT and VERSION. A example would be :
C:\PRODUCT\VERSION\root\Panel\Precision\Firmware
- PRODUCT can be Nucoda or Phoenix
- VERSION is format 2014_1 etc.
Cabling
Each panel has :
- A separate power supply (12V, 4 pin DIN style connector)
- An ethernet network port

Power
Connect each panel to a power source using the supplied power cables.

Network
Ethernet Ports
Each panel has two ethernet ports. Use the top one (see Figure 2 above).
IP Addresses
The Precision panels have the following TCP/IP network addresses by default :
| Panel | IP Address |
| Colour | 192.168.21.1 |
| Transport | 192.168.21.2 |
| Touch | 192.168.21.3 |
To change these, see below.
Environment
If you tick the Precision Control Panel option during software installation, an environment variable is created and lists the default IP addresses of all Precision panels, comma separated.
| Variable | Value |
| NUCODA_PRECISIONPANEL (or PHOENIX_PRECISIONPANEL) |
192.168.21.1,2,3 |
If you are using a Colour panel only and select this during install, the value set will be the IP address of the Colour panel only (i.e. 192.168.21.1).
Host IP Address and Settings
By default, the host computer network port connected to the panels is set to :
| IP Address | 192.168.21.4 |
| Subnet Mask | 255.255.255.0 |
If you change this you will also need to set the appropriate panel IP addresses as well. See Setting the Precision IP Addresses below.
Setting the Precision IP Addresses
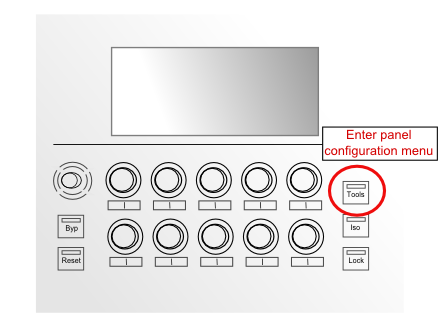
To change the Precision panel IP addresses, enter the panel configuration menu.
- Enter the configuration menu by holding the Tools button on the panel when powering it up (the left Tools button on the Precision Colour panel) :
- Once powered up, the panel configuration screen will be shown.
- Use the left joystick to navigate the menus :
- up /down options
- press to select
- Select :
IP Configuration>
The IP Configuration screen will display the current IP address settings and let you change them.
The currently selected option will be highlighted in red. - Press the joystick button to select and enter the IP Configuration menu.
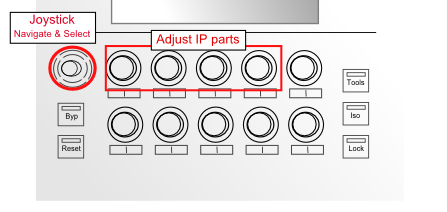 3: Joystick navigation and adjustment knobs.
 - The ethernet port used is listed at the top :
Current Address eth0 : - Set the ethernet eth0 address :
With Current Address eth0: selected (and highlighted in red), use the four knobs below the display (as shown in Fig 3 above) to adjust the IP address components. - Set the Server address :
Now use the joystick to select the Server Address option. Then use the four knobs below the display to set this to the IP address of the host computer (i.e. the workstation running the Digital Vision application). - Once done, use the joystick and select :
Reboot


Remember that each panel has a separate ethernet port and TCP/IP address. Each is configured using the same process as described above.
If you change the IP address of any of the Precision panels, you will also need to update the environment variable (i.e. NUCODA_PRECISIONPANEL or PHOENIX_PRECISIONPANEL).
Firmware
This section describes how to update the Precision panel firmware.
Firmware can add new functionality or modify existing functionality. Digital Vision will communicate this requirement to you.
To update the Precision firmware, you will need :
- The new firmware files.
There may be up to 8 files (e.g. fw1.pkg,..,fw8.pkg). Some might be 0 (zero) bytes in size and wll be skipped automatically. - A TFTP (Trivial FTP) server program.
The TFTP program is used to transfer (push) the firmware files to each panel.
Firmware Files
Firmware files are included in the installer and placed in folder :
C:\PRODUCT\VERSION\root\Panel\Precision\Firmware
Firmware Version
Before doing the firmware update, you should note the current firmware version installed. This will be a date and time, displayed via the configuration menu on panel boot. Do this for each panel.
As described above, to enter the configuration menu, hold down the Tools button on panel boot and select :
Show version >
The firmware version is displayed as the Panelapp date and time :
...
Panelapp: panelapp 05/10/2011 10:25:18 AM
...
Installing the Firmware
We will use a TFTP program tftpd32.
This is included in the installer and placed in folder :
C:\PRODUCT\utilities\tftpd
To install the firmware :
- Double click tftpd32.exe to start it.
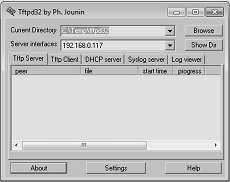
- Set the Current Directory to the folder containing the firmware files (use the Browse button to set this).
- The Server Interface shown should be the IP address of the host computer network port (connected to the Precision panel).
This IP address should match that used as the Server Address in step 8 of the Precision IP Configuration steps above. - Power cycle each panel in turn, while holding down the Lock button on each (the left Lock button on Precision Colour) (see below) :
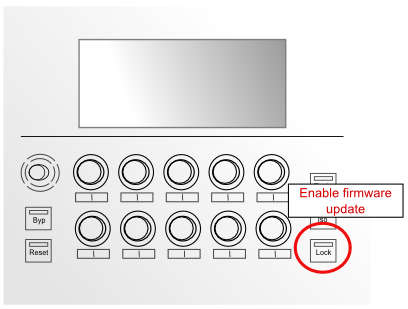
The firmware files will be sent from the host computer to each panel by tftpd32.
On completion, each panel will reboot automatically. - On restart, check the firmware version and make sure the update was successful.
- Repeat this procedure for each panel in turn.


Troubleshooting the Firmware Update Process
If you have problems with the firmware update, check the following points :
- Check that each panel has the expected IP address configuration.
- Make sure that the host computer network port connected to the panels is configured to be on the same TCP/IP subnet as the panel network.
- Make sure you can ping each panel from the host computer.
- Disable any Windows firewall on the host computer network port connected to the panels.
Precision Emulator
A Precision Panel software emulator program is included with the application.
This is a fully emulated version of the Precision Panel and behaves in the same way as the actual hardware. You can use the emulated panel controls and interact with a running application as if you had a real panel.
Starting the Emulator
The emulator is started via a BATCH file.
This is linked on your desktop after install and also located under the application folder :
- Desktop\Precision Emulator VERSION
- C:\PRODUCT\Precision - Emulator\Precision Emulator VERSION.bat
To start the emulator, double-click the batch file shortcut i.e.
![]()
- Desktop\Precision Emulator VERSION
This :
- Sets up the Precision Panel environment
- Starts the emulator (Precision.exe)
- Starts the Digital Vision application (e.g. Nucoda, Phoenix Finish etc.)
Once the application initialises the emulated panel, the panel displays its welcome screens as usual.